
The New Signature Oval by Jonathan "Rhino" Weingarten
The New AGS Ideal Cut Oval by Jonathan "Rhino" Weingarten

Greetings and welcome to our tutorial on the New Signature Oval by your's truly. Over the course of the past years I've been developing and re-inventing a number of new cuts since the August Vintage products. Our new oval is the first to be released and instead of doing half a job, I've taken the shape to a whole new level not yet seen or witnessed in our industry before. While we think of a good name to trademark, first some introductory info...
In the following video I explain how our new signature oval came to be and use one of the brightest commonly cut ovals I could find to compare it too. I show the oval in
- office lighting,
- spot lighting and
- natural daylight.
Re-Inventing the Oval Brilliant Cut
Before the days of "ideal cut" diamonds and when education on the subject of cut quality was extremely limited, consumers who were buying diamonds would generally see the following graphic and do the best they could to purchase the diamond that was closest to the "ideal" standard they learned about.

The days of line art drawings have come and gone and real science has impacted our industry in an overwhelming way as we are now able to measure the percentage of how much light enters and exits and know the best angles to achieve maximum brightness, fire & sparkle in a diamond. Below are ray tracing examples of various proportioned rounds.
 |
 |
 |
| cut too shallow | Ideal Cut | cut too deep |
I'd like to draw your attention a little closer to the above graphics because when it comes to fancy shaped diamonds like the oval brilliant cut, not one but two of these graphics come to play when it comes to ovals on the current market. There is the profile to consider along the width as well as the profile to consider along it's length.
When we look at an oval along it's width measurement we're seeing the profile, primarily of it's belly. This is the area where well cut ovals will display the best light return.
Observing the profile of a well cut oval along its width, it appears very similar to that of the ideal cut round. Ray tracing and ASET technologies confirm this.


In the ray tracing program, as we run a beam of light into the crown we get consistent light return along the belly and in the ASET image we see the richest amount of reds across the belly as well. Reds and in certain cases blue, in the ASET result in those parts of the diamond that will display rich light return.
You can also observe this in many of the videos I've shot of ovals over the years and you can also observe it in accurately shot photography in real world observation. Here is one such video below.
The Problem with Oval Brilliant Cuts Today
The problem with oval brilliant cut diamonds are three fold.
- Oval brilliant cuts, even supposedly the "best" cuts are by nature too shallow when you leave the belly area and begin observing from the mid section up.
When we look at the profile of an oval along it's length we can't help but notice how similar it is to the shallow cut round from our first graphics. The first graphic on the left is a shallow cut round the 2nd on the right is the profile of an oval along its length. It's even more shallow than the "shallow round".


2. These areas which are too shallow suffer from extraneous light leakage coupled with drawing too many reflections from dull areas in our environment which causes two ill optical effects. Those being ...
-
severe loss of brilliance.
-
color absorption
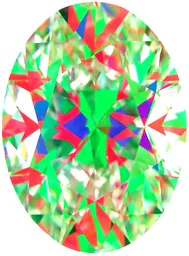
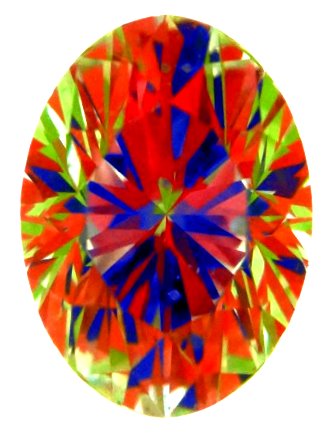
Severe loss of brilliance. When we run typical ovals through ASET analysis we observe the severe loss of brilliance particularly noted on the upper and lower parts of the diamond. You can see this clearly in the first 3 graphics below as indicated by all the extraneous white and green areas. The new signature oval by AV Inc. (on the far right) has solid reds/blues in those areas ensuring the diamond is grabbing and reflecting light at these most crucial areas. Ie. no brilliance lost where it typically has always been lost.


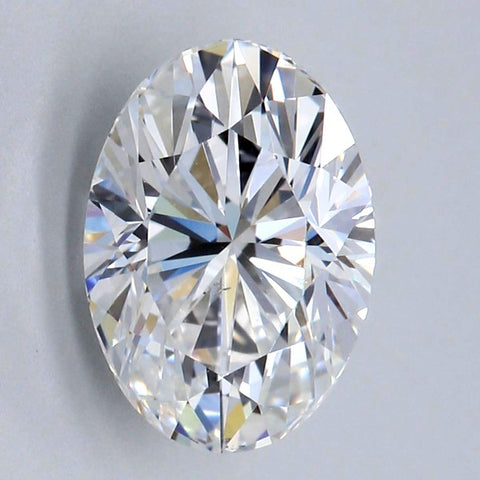
The bow tie effect. Oval, pear and marquise brilliant cuts are notorious for having a bow tie effect. Most of the time when consumers shop for these cuts they accept the fact that they're going to get a leaky diamond, less brilliant so the primary thing they focus on getting is one of these shapes that has the least visible bow tie. This "bow tie" effect is virtually unavoidable in modern oval brilliant cuts and exists as either faint, medium, strong or very strong depending on the proportions. What causes the bowtie? It is the reflection of your own head and body shadow reflecting across the belly of the diamond and generally on a pavilion main facet. The accompanying graphic is a fantastic example. In commonly cut ovals however, the more you eliminate the bowtie usually means more light leakage in the diamond which is almost counter intuitive as you're sacrificing one bad optical effect for another equally bad optical effect.

- Eliminate the bowtie and replace it with bright white reflections of light.
- Eliminate the "mush" caused by light leakage on the north/south sides of the diamond and
- Eliminate the resultant color absorption making your diamond look more yellow than what it is actually graded ...
Then you are a perfect candidate for the new AGS Ideal Cut Opulence Oval.